
I was looking at my old blog posts and found this old stamp tutorial that I made two years ago and I
laughed at how horrible it was haha! So I decided to do an updated tutorial that is more detailed and
fun! I used to make hand carved stamps for my shop EatPrayCreate so it's been something that i've
been doing for quite some time! For those of you that are interested in getting started, be sure to take
your time and practice! I wasn't too good at first (this was my very first stamp that I carved) but once
I continued to practice I got better! Anyways, I hope you enjoy this tutorial I created for you guys! (:
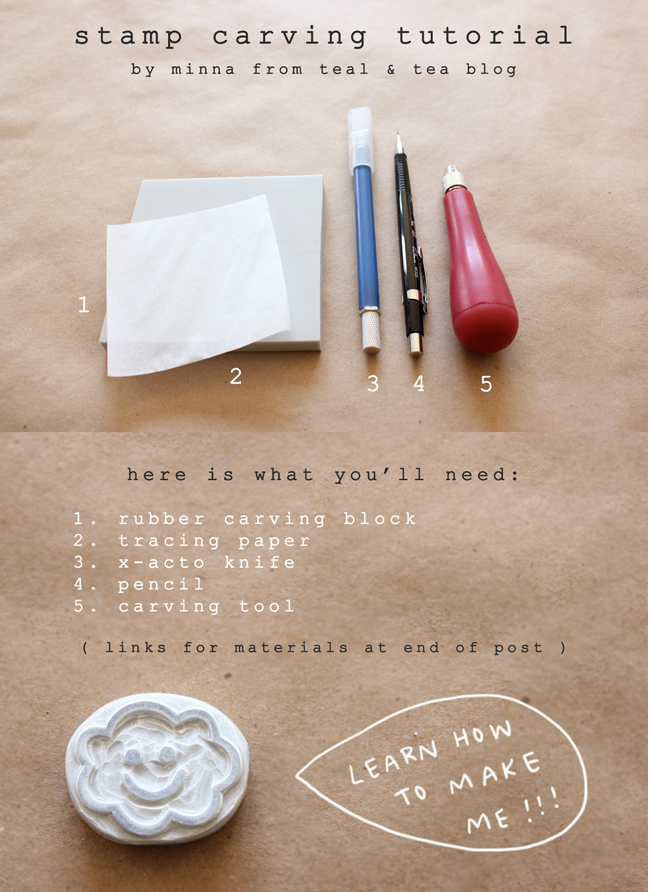


Here is where you can get the materials:
1. rubber carving block - staedtler mastercarve block
2. tracing paper - purchase at any local craft store
3. x-acto knife - purchase at any local craft store
4. pencil - you can use any old pencil lying around
5. carving tool - speedball linoleum cutter
You know what? I've been looking forever for a press for cookies..........I think I just found it. Bonus, I can have any design!
ReplyDeleteawesome! glad i could help (:
Deleteif you have any questions just ask!
LOVED the tutorial! And love the aesthetic of your blog - so pretty!
ReplyDeleteYour blog makes me smile :) Loved the tutorial, too!
ReplyDeletegreat tutorial think you i cant wait to try it xxx
ReplyDeleteAwesome tutorial! Definitely want to try this. Just discovered your lovely blog through the Etsy blog team.
ReplyDeleteThanks for the tutorial! I have all the supplies (I got them last summer, but have never took the plunge yet!) And I love your happy cloud stamp!
ReplyDeleteI just wanted to say a very warm thank you for this tutorial. I'm in finals week for my Illustration MFA at grad school, and my final project will involve rebranding my jewelry business. I already knew I wanted to re-illustrate my logo, and now I have a step I can take to go farther with the project with my packaging!
ReplyDeleteThank you so so much!
<3 Erin
This DIY tutorial is absolutely wonderful and adorable!
ReplyDeleteI love the cloud stamp, your photography and blog layout!
How inspiring!
So nice to meet you through Etsy’s Blogging Buddies Team.
I am your newest blog follower! :)
All the best,
Mary
Mixed-Media Map Art
Wow...this is great! I'm a new blog follower - found you through Etsy's BB team. Looking forward to more of your posts.
ReplyDeleteGreat tutorial! I love the new stamp :)
ReplyDeleteHi! I'm Tristan, I'm your newest follower. I love this tutorial and looking forward to seeing what you post in the future! Interesting blog!
ReplyDeleteCheck mine out too!
tristanlynae.blogspot.com
Fantastic tutorial! I'll have to give this a go at some point. Oh, the ideas I have now! Thanks for sharing. :)
ReplyDeletexo.
This is unbelievably easy! Thanks so much for sharing and inspiring.
ReplyDeleteFantastic, thank you for sharing! :D
ReplyDeleteCrazy, I just did a stamp DIY on my blog too! I'm only just getting started and I used linoleum. It was harder to carve than I thought it'd be. I think I'll go out and get a rubber block next time. Thanks for this!
ReplyDeleteGreat tutorial! Thanks for sharing. I have a kit like the one you used--but I've always been too affraid to use it, lol. I think I'll try it now :-D
ReplyDeleteGreat!! thankg is wondderfulll!!!! fantastic.
ReplyDeleteBeautiful photography and a nice tutorial! I've read through every stamp carving tutorial I can find online plus I now have 3 books on just that topic (it's a hot topic - 2 of the 3 just came out within the last year!). One answer I can never find is whether anyone has any tip or tricks for cutting around very small circles - specifically eyes. I've been practicing and I've made a lot of stamps, but every time I do a face I have a terrible time getting the eyes right. They are either irregular, too big, too small, unmatched, or end up being lopped off altogether. I get the best luck from using the smallest Speedball gouge and holding it still while I turn the piece, but that often results in spirals. I think I might have more luck with an even smaller gouge, but the micro-gouges I've found (made for carving wood) are pretty pricey. If you or any of your readers has any tips, I would really appreciate it! Peace!
ReplyDeleteI love it!!!
ReplyDeletewoot woot. thank you for this!! I just carved 2 bunnies already :)
ReplyDeleteHello, thanks for your help and great images. Tell me where do I get de Color boxes in many colors ? Here in Perú we don´t have enough variety. Only black-red and blue.
ReplyDeleteWhere are they from ?
Thanks a lot,
Catalina
Awesome tutorial. I am using it for my CubScout den meeting tomorrow. Thanks!
ReplyDelete